Notice
Recent Posts
Recent Comments
Link
| 일 | 월 | 화 | 수 | 목 | 금 | 토 |
|---|---|---|---|---|---|---|
| 1 | 2 | 3 | 4 | 5 | 6 | 7 |
| 8 | 9 | 10 | 11 | 12 | 13 | 14 |
| 15 | 16 | 17 | 18 | 19 | 20 | 21 |
| 22 | 23 | 24 | 25 | 26 | 27 | 28 |
Tags
- 초보
- grpahQL
- JS
- 코딩
- react
- underbar
- 자바스크립트
- method
- nqueens
- 제일어려워
- 개발
- 포스기
- 공부
- underscores
- JavaScript
- array
- this
- 엔퀸즈
- DOM
- 리액트
- Instantiation Patterns
- 해커톤
- ftech
- 코드스테이츠
- 클라이언트
- 알고리즘
- 일상
- 취업
- vscode
- 연습
Archives
- Today
- Total
analogcoding
typescript 에서 storybook 사용하기 본문
웹팩 + 타입스크립트 + 리액트 + styled components 로 진행 중인 프로젝트에 storybook 도입을 시도했다.
참고문서
Ts+storybook
px -p @storybook/cli sb init
스토리북 설치
.storybook/webpack.config.js
생성된 스토리북 폴더에 webpack module 추가
module.exports = ({ config, mode }) => {
  config.module.rules.push({
    test: /\.(ts|tsx)$/,
    use: [
      {
        loader: require.resolve("babel-loader"),
        options: {
          presets: [["react-app", { flow: false, typescript: true }]],
        },
      },
      require.resolve("react-docgen-typescript-loader"),
    ],
  });
  config.resolve.extensions.push(".ts", ".tsx");
  return config;
};
ts 및 tsx 확장자에 대하여 babel-loader 와 react-docgen-typescript-loader 를 사용하도록 설정한다.
.storybook/config.js
import { configure } from '@storybook/react';

configure(require.context('../src', true, /\.stories\.(js|mdx|tsx)$/), module);
tsx 파일도 Storybook에서 처리하도록 코드를 수정
src/typings.d.ts
declare module '*.mdx';
추후 ts 파일에서 mdx 확장자로 이루어진 파일을 불러오게 될 때 모듈이 없다는 에러를 방지.
Button 컴포넌트를 모아둔 폴더에 Buttons.stroies.tsx 파일 생성
import * as React from "react";
import { DefaultBtn, StyledBtn } from "./Buttons";

export default {
  title: "components|Button",
  component: DefaultBtn,
};

// title 은 상위 폴더가 되고 | 뒤에 내용이 하위 폴더로 추가된다.

export const defaultbtn = () => {
  return (
    <DefaultBtn theme={{ width: 300, height: 50, fontSize: 16 }}>
      이메일 로그인
    </DefaultBtn>
  );
};

defaultbtn.story = {
  name: "defaultBtn",
};

// 추가될 스토리의 이름을 설정한다.

export const googleLoginBtn = () => {
  return (
    <StyledBtn
      theme={{
        width: 300,
        height: 50,
        fontSize: 16,
        radius: 5,
        backGroundColor: "#dd4b39",
        color: "white",
      }}
    >
      Google 로그인
    </StyledBtn>
  );
};

googleLoginBtn.story = {
  name: "googleLoginBtn",
};
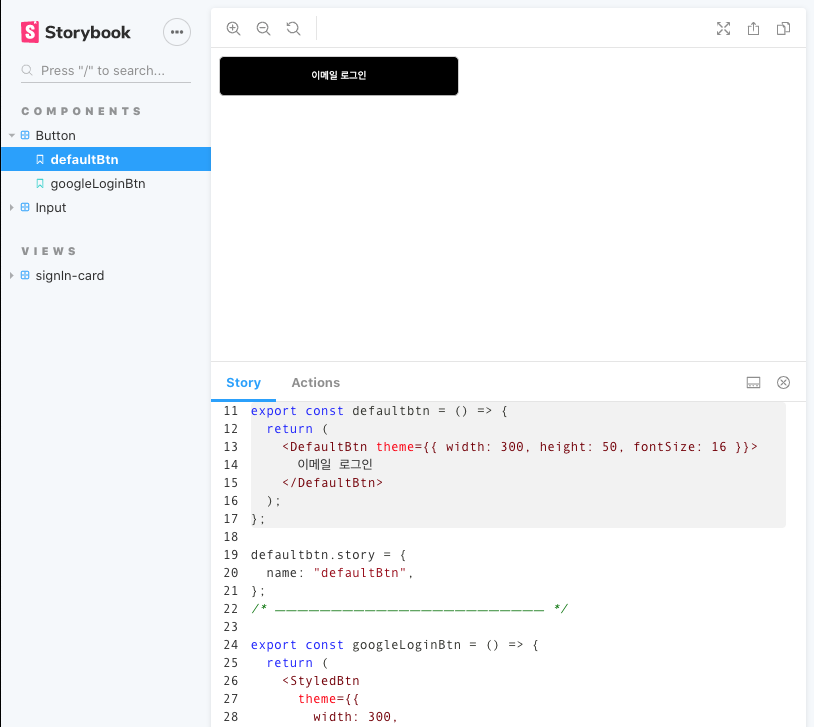
화면에 story code 가 나오는데 이것은 추가로 모듈을 설치해야 한다.

스토리 소스 에드온을 추가
npm i @storybook/addon-storysource.storybook/main.js 에 addons 추가한다.
module.exports = {

stories: ["../stories/**/*.stories.js"],

addons: [

"@storybook/addon-actions",

// "@storybook/addon-links",

"@storybook/addon-storysource",

],

webpackFinal: async (config) => {

// do mutation to the config


return config;

},

};
마지막으로 webpack.config.js 부분 rules 에 아래 코드를 추가하면 확인할 수 있다.
 (module.exports = function({ config }) {
        config.module.rules.push({
          test: /\.stories\.tsx?$/,
          loaders: [
            {
              loader: require.resolve("@storybook/source-loader"),
              options: { parser: "typescript" },
            },
          ],
          enforce: "pre",
        });

        return config;
      }),
다음에는 action 까지 추가해보는 걸로!
'Be well coding > Mine' 카테고리의 다른 글
| react + typescript 절대경로 import (2) | 2020.05.15 |
|---|---|
| error Failed to build iOS project. We ran “xcodebuild” command but it exited with error code 65 (0) | 2020.05.11 |
| Git branch 이름 변경 (0) | 2020.04.22 |
| node.js crawling 간단한 예제 (0) | 2020.04.20 |
| react - ROSLIB 사용기 (0) | 2020.04.17 |
Comments
